


Hello everyone! Artist and guest blogger, Missy, here again with a fun activity for busy hands. I am going to teach you how to weave. Weaving is a process for forming textiles or fabrics by interlacing threads. Instead of using fabric and thread, we are going to learn to weave using paper.
Supplies:
- 8.5”x11” Construction paper (or card stock) in multiple colors
- Scissors
- Pencil
- Ruler
- Glue
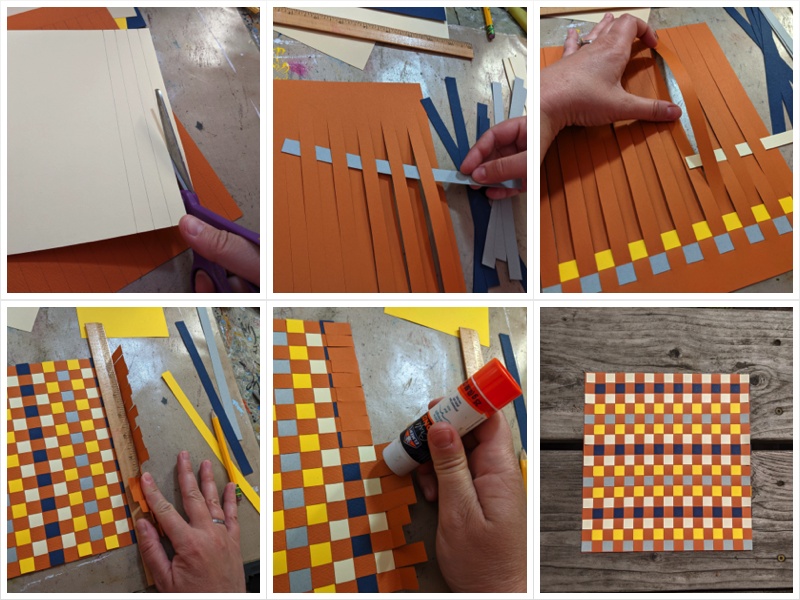
Instructions:
- Choose one sheet of paper and lay it vertically on the table. Use your ruler to measure 1” from the top on either side and make a mark with your pencil.
- Connect those marks with a straight line.
- Make a pencil mark along the line every ½ inch.
- Make a pencil mark along the bottom of the paper every ½ inch as well.
- Turn your ruler vertical and use your pencil to draw lines connecting each of these ½ inch marks you made.
- Now use your scissors to cut along each of those vertical lines. Stop at the first line you drew 1” from the top of the paper. (Do not cut that horizontal line). This first paper is called the “warp.”
- Take a few other papers in different colors, lay them vertically, and make ½ inch marks along either side.
- Connect the ½” marks with pencil lines, then use your scissors to cut these additional papers into strips. (You will need about 17 strips). These strips are called the “weft.”
- Flip your “warp” over to the backside to hide your pencil lines and place it vertically on the table.
- Take one of your pieces of “weft” and start feeding it through the “warp” (I like to move right to left because I am right handed), over the first ½” strip, under the next and so on. Over, under, over, under.
- When your “weft” gets all the way to the left side of the “warp,” scoot the “weft” as far up to the top as you can.
- Now take a different colored “weft” and feed it through the “warp.” This time feed it under first. Under, over, under, over. It will be opposite of the first “weft.”
- Scoot this “weft” up snug against the first “weft” once it is fed all the way through.
- Repeat steps 10-13 until there is only about an inch of “warp” left at the bottom.
- Fold the top 1” and bottom 1” of the “warp” to the backside and glue them down.
Wrap-up:
Voilà! You now know how to weave! The little paper weaving project you created can be hung on the refrigerator or you can frame it. I have been using mine as a beautiful, fun placemat. Try different colors and different patterns when you weave. You can get even more advanced and try weaving over one, under two, over one, under two. Or create your own sequence. The possibilities are endless! Have fun!
.jpg)