
Grow Microgreens And Sprouts At Home: Getting Started

Email share
Sprouts in grow trays

Have You Ever Wanted To Grow Microgreens Or Sprouts?

You’ve probably heard of microgreens and you’ve most likely eaten sprouts, but have you ever had the desire to try and grow them?

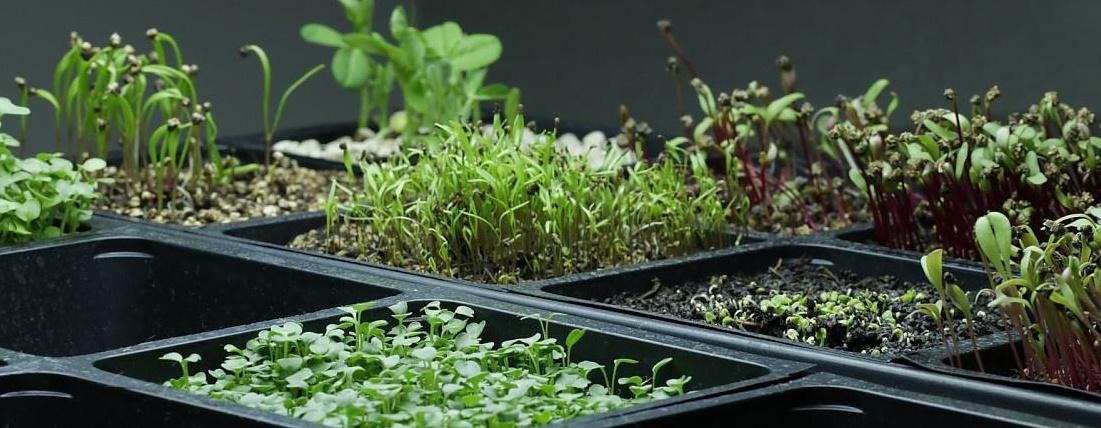
Modern Gardener set out on a microgreen and sprout growing experiment to find out as much as we could about growing these tasty, little greens. We wanted to find out how easy (or difficult) the process could be, what materials are needed, how long it takes, what can be grown and sprouted, and finally, what they taste like, and what they taste good with.

Our initial set-up.

Along our journey, we met some interesting folks and learned a lot about microgreens, sprouts, and seeds. This is the first of a three-part mini-series on growing microgreens and sprouts, so click on the links at the bottom of this blog to see parts two and three.

The biggest takeaways? It’s so easy and fun to grow microgreens and sprouts! The list of items needed (see below) is short and relatively cheap. You can do this on your kitchen counter or window seal, and we think kids would have fun joining in on the project. They’re also packed with nutrients and are the perfect addition to a sandwich, your favorite brunch eggs, or as a light and zesty side to a warm dinner.

Video: Growing Microgreens And Sprouts, Part 1

How To Start Growing Microgreens And Sprouts Indoors

We set up a growing station in the office equipped with a grow light (which isn’t a requirement) and two growing trays. We also had two sprouting jars and an additional tray of corn seeds which we grew in complete darkness.

Growing Microgreens and Sprouts Part 1. Copy Right KUED. Day 1 of our growing trays with hydroponic paper (L) and potting mix (R).

We visited with local seed vendor, Mountain Valley Seed Co., and spoke with partner Robb Baumann to get more information and tips from a pro. Robb has been growing microgreens for about eight years and often teaches microgreens classes with the University of Utah Continuing Education program.

"If you think about it, everything that seed needs, it's all there, inside the seed; all of its energy, its DNA, its structure, plus its ability to grow with or without light or soil to an edible stage. It's incredible."

    - Robb Baumann

The seeds used to grow microgreens and sprouts are the same seeds you would use to plant in your garden, so it’s good practice for starting seeds from scratch. You can do it!

What Are Microgreens?

Smaller than “baby greens” and harvested after the sprouting stage, microgreens are the stage after the plant has sprouted its first “true leaves” after its cotyledon leaves.

Radish microgreens.

What's The Difference Between Microgreens And Sprouts?

Microgreens are grown in a potting mix or hydroponic medium. You don’t eat the roots, just the shoots. They’re harvested at a later stage than sprouts.

Sprouts aren’t grown in any medium. You only need to rinse them periodically. The entire growth is edible, including the root, radicle, and shoot.

Radish, alfalfa, and broccoli sprouts on avocado toast.

List Of Materials For Microgreens

10x20 Tray

This is a standard sprouting tray that is 10-inches in width by 20-inches in length (commonly called 1020 tray). You can find them with drainage holes, or without, at most gardening stores. Also, be sure to grab the clear plastic lid if it’s not already included with the tray.

You can reuse this try to continue to grow microgreens, you’ll just want to sanitize it first before reusing it.

5x5 inserts (optional, but recommended)

These are smaller containers (five inches in width and length) that fit into 1020 trays. Eight 5x5 trays will fit perfectly into one 1020 tray, giving the option to grow a variety of microgreens.

The 5x5 almost always has holes in the bottoms for drainage of water. If you’re using the 5x5 inserts, then you'll want a 1020 without holes so that water doesn’t leak out of the 1020 tray. You can always place a cookie sheet beneath the trays for extra water protection.

Soil? No soil needed

There are three standard growing mediums:

  • Coir (a coconut husk composite)
  • Hydroponic material
  • Soilless potting mix. Typically, the bags of “potting soil” you see at your local store are actually soilless.
 
Seeds

The list of seeds we grew is given in the video. You can use the same seeds that are sold in the seed packets available at your local garden store, but if you’re getting serious about microgreens it’s cheaper to buy bulk.

List Of Materials For Sprouts

Sprouting jar and lid

You can use a quart-sized mason jar. There are a number of companies that sell sprouting lids that fit a wide-mouth mason jar. Most are plastic, but you can also find stainless-steel lids like the ones we use in the video.

Seeds

Not all seeds can be consumed as a sprout. For example, basil seeds form a mucus layer around the seed as soon as it gets wet, which would cause the seed to rot in the jar before successfully sprouting. This is why, as Robb Baumann says, you’ve never eaten a basil sprout. You’ll want to do some research as to what you can sprout. The sprouting seeds we sprouted are listed in the video.

Soaking the sprouting seeds.

That concludes Part 1 of our 3 part series on growing your own microgreens and sprouts! If you're interested in learning more check out our Part 2: Planting and Watering and Part 3: Growing and Eating blog posts.

If you live in Utah and have a garden or garden project that you'd like to be featured on Modern Gardener, click here!

STREAM ANYTIME, ANYWHERE